One generous cup: 20 g coffee, 320 g water
Use a V60 size 02 or a compatible cone dripper, its matching paper, a mug or server, kettle, scale and timer. This recipe is an original editorial starting point; coffee, filters and grinders will change the result. It has not been taste-tested by Coffee Jacob.
The ratio is dry coffee to water poured: 1:16. Expect roughly 280 ml of drink if the grounds hold about 2 g water per gram of coffee. That yield is an estimate, not an instruction to keep pouring until the server reaches 320 ml.
| Variable | Starting point |
|---|---|
| Coffee | 20 g, medium-fine; finer than coarse press grounds, visibly granular |
| Water | 320 g at 94°C / 201°F |
| Bloom | 60 g, then wait until 0:45 |
| Second cumulative target | 200 g by about 1:20 |
| Final cumulative target | 320 g by about 2:00 |
| Typical finish to investigate around | 2:45–3:30, including bloom; taste outranks the clock |
Set the scale once; follow cumulative targets
The scale stays under the brewer and server for the whole brew. After adding coffee, tare to zero; do not tare again between pours. The numbers below include everything already poured.
- Fold the paper seam if required and fit the filter. Rinse it with hot water to seat it and preheat the brewer. Empty the rinse water from the server before brewing.
- Add 20 g freshly ground coffee and level it with a light shake. Put the brewer and server on the scale and tare.
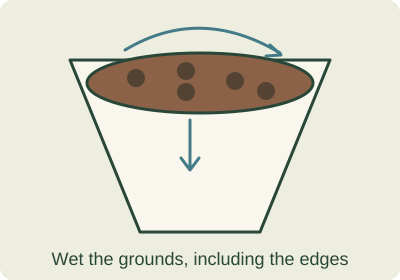
- Start the timer and pour to 60 g over about 15 seconds, covering every dry patch. Give one small, safe swirl if needed; wait until 0:45.
- Pour a gentle moving stream onto the coffee, avoiding prolonged pouring directly on the paper. Reach 200 g by about 1:20. Pause if the slurry gets too close to the rim.
- At about 1:30, pour again to 320 g, finishing near 2:00. This last addition is 120 g, not another 320 g.
- Allow the water to drain. Note the time when the main flow becomes occasional drips. Remove the dripper safely and swirl the server to mix the coffee.
- Let it cool enough to taste. Record the dose, final water, finish time and one sensory observation before deciding the next change.
Evidence: Hario UK: basic V60 preparation
Scale the amounts without overfilling the brewer
This recipe uses 18.75% of water for bloom, 62.5% as the second cumulative target and 100% at the finish. The table rounds intermediate targets for a kitchen scale. Bigger batches usually need more pouring time and may benefit from a slightly coarser grind; do not force a larger batch into the small-batch clock.
Brewer numbers are product sizes, not universal mug capacities. For 500 g water, use a suitably sized dripper and a server that holds the finished drink with headroom. If the slurry threatens to overflow, pause the pour; if the dose crowds the filter, divide the brew.
| Brew water | Coffee at 1:16 | Bloom target | Second target | Final target |
|---|---|---|---|---|
| 240 g | 15 g | 45 g | 150 g | 240 g |
| 320 g | 20 g | 60 g | 200 g | 320 g |
| 500 g | 31.25 g | 94 g | 313 g | 500 g |
Eight useful observations, eight different next tests
Read taste and flow together. A brew finishing outside the suggested range can still taste good. Make one change, repeat, and compare after similar cooling time.
| What happened | Try next | Why this test |
|---|---|---|
| Sour and fast | Grind one small step finer; keep 1:16 and the same pours. | Tests whether more contact and extraction improve the sharpness. |
| Bitter or drying and very slow | Try a small coarser grind change, with gentler agitation. | Tests restricted flow; roast bitterness may remain. |
| Sour and bitter with a crater or uneven wetting | Improve wetting and keep pours low and gentle before changing grind. | Uneven extraction can make contradictory flavors. |
| Balanced but weak | Use 21.3 g coffee with 320 g water (1:15). | Changes strength; a finer grind is not the only route. |
| Balanced but too intense | Dilute this cup a little; next brew try 18.8 g with 320 g (1:17). | Separates concentration from extraction. |
| Stalled or overflowing | Stop adding water and let it settle safely. Next time check paper fit, reduce agitation and try coarser grounds. | A blocked filter or excess fines needs a flow test. |
| Very fast but tastes good | Keep the recipe and record it. | Time alone is not a failure. |
| Flat despite consistent technique | Clean the server, use fresh potable water, and compare coffee freshness or roast preference. | Not every problem starts at the grinder. |
Evidence: Barista Hustle: strength, extraction and unevenness
Adapt deliberately to the coffee and kitchen
For a lighter roast that remains sharp after even wetting, try 96°C / 205°F while keeping grind and ratio fixed. For a darker roast that tastes harsh, try 90°C / 194°F first. These are experiments, not rules that assign one temperature to every roast.
For a small 15 g dose, start with 240 g water and the scaled targets above; shorter drawdown is plausible. For 31.25 g and 500 g water, allow more room and time. Record the actual finish instead of labeling a four-minute larger brew wrong.
Without a gooseneck kettle, use short controlled pours from a safe height and pause before the water approaches the rim. Do not transfer boiling water into a jug that is not designed for it. If controlled pouring is awkward, an immersion dripper removes much of that work.
A five-pour recipe is a separate experiment: for 20 g and 320 g, try cumulative targets of 60, 125, 190, 255 and 320 g, beginning the pours around 0:00, 0:45, 1:15, 1:45 and 2:15 as flow permits. Extra pouring and agitation change extraction; do not expect the same finish time as the three-pour recipe.
For flash iced coffee, split a total recipe between hot water and ice. The dedicated iced-filter guide gives a 20 g / 200 g hot water / 120 g ice method; simply adding ice to a normal 320 g hot brew changes its strength.
Evidence: Whole Latte Love: pour-over variables and equipment
A cone, a flat bed and a Chemex need different handling
A V60-style cone depends strongly on the bed and pouring pattern. A Kalita Wave uses a flat bed and its own corrugated paper: protect the paper's shape and use the flat-bottom recipe. Chemex uses a folded filter whose thicker side supports the spout; the air path must remain open. Swapping brewer names while keeping every instruction unchanged misses those practical differences.
Reusable metal filters may leave more oils and fine particles in the drink. Cloth needs its own cleaning routine. If changing filter type, start a new log entry rather than assuming the old grind and timing will translate.
Evidence: Kalita USA: dripper geometry · Chemex: filter placement
Finish the brew and prepare for the next one
Let the wet filter cool enough to handle, then dispose of the paper and grounds according to local rules. Rinse the dripper and wash the server so old coffee oil does not become tomorrow's flavor. Follow the manufacturer's cleaner and dishwasher instructions for the material.
Check glass or ceramic for damage and keep the hot brewer stable when lifting it off the server. If a brew overflowed, let the equipment cool before clearing grounds from seams or the scale. A clean dry setup is part of repeatability, not an optional finishing touch.
Sources & limitations
This guide combines source-based explanations and practical starting points. Coffee Jacob has not performed hands-on product testing or controlled tasting trials for this guide. Source check: 13 October 2026.