Plan the drink and the pitcher together
For a smaller latte-style practice drink, prepare a 36 g espresso and about 150 ml cold milk in a suitable 350 ml steaming pitcher. That starting fill leaves room for expansion while usually allowing a traditional wand to reach the milk; your pitcher and machine may specify a different minimum. Use a thermometer while learning.
The goal here is glossy pourable milk with fine bubbles, not a large dry cap. More aeration suits a foamier cappuccino; less suits a flat white or cortado. These are serving choices with regional variation, not rigid universal definitions.
Our starting dairy target is about 60°C / 140°F. This is a texture and serving-quality choice, not a pasteurization process or a guarantee that neglected milk becomes safe. Let the finished drink cool to a comfortable temperature before drinking.
Choose measured espresso and milk portions in the drink recipes. Follow this page for the texture and handling sequence.
For an observable practice target, start 150 ml cold milk and try a modest rise to roughly 175 ml for a lightly textured latte. For a foamier trial, compare a rise toward 200 ml while staying within pitcher headroom. These are rough editorial practice marks, not universal drink standards: record the actual starting and finishing level, then change only the early air intake on the next attempt.
The 150 ml practice batch does not promise the 170 g delivered milk used in the larger latte recipe. For that drink, begin with approximately 190 ml cold milk in a suitable larger pitcher, such as 450 ml if the machine permits that fill, then weigh 170 g into the espresso. Leave expansion room, meet the wand's minimum depth and measure leftovers to refine the next starting amount.
Evidence: Whole Latte Love: expert milk technique, pitchers and machine differences
The movement that changes the foam
Imagine the wand held still while your hand moves the pitcher. Moving the pitcher down brings the milk surface closer to the tip and may expose it to air. Moving the pitcher up puts more milk above the tip, making it deeper. Small movements are enough; exposing the tip fully can spray hot milk.
| Purpose | Tip relative to milk | Pitcher movement with wand held still | What to observe |
|---|---|---|---|
| Add a little air | Just below the surface | Lower very slightly if the tip is too deep | Soft intermittent air intake; gentle increase in volume |
| Stop adding air | A little deeper below the surface | Raise the pitcher slightly | Air-intake sound stops |
| Mix the texture | Off center, submerged | Small tilt/sideways adjustment | A rolling circulation folds foam through the milk |
| Finish safely | Still submerged | Keep stable; switch steam off first | Only remove after steam stops |
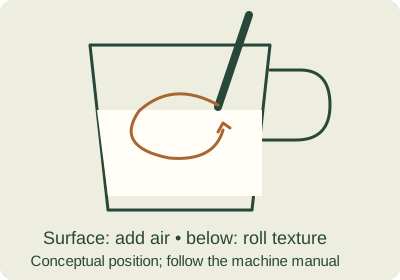
A complete manual-wand sequence
Start with fresh refrigerated milk and a clean pitcher. Keep the towel used on the wand clean and separate from a dirty counter cloth. Steam and metal can burn even when the milk is still relatively cool.
- Select the drink and measure its cold milk. Fit a suitable thermometer without obstructing the wand or letting it misread the pitcher wall.
- Purge the wand briefly into the drip tray as the manual directs, then turn steam off before positioning the pitcher.
- Place the tip just under the surface and slightly off center. Support the pitcher securely and start steam.
- Add air early in the process with a restrained surface position. Stop adding air when the volume has increased enough for the chosen drink.
- Raise the pitcher a little to submerge the stationary tip more deeply. Adjust the angle to establish a rolling circulation that mixes the bubbles through the milk.
- Watch the thermometer and stop steam before overshooting the selected target; allow for the thermometer's response delay.
- Keep the tip submerged until steam stops, then remove the pitcher. Immediately wipe the wand and perform the prescribed purge away from hands.
- Tap the pitcher gently if large bubbles remain, then swirl until the milk looks integrated. Pour promptly into the espresso instead of leaving foam to separate.
Evidence: Breville: basic manual steaming sequence · Breville: wand cleaning and unblocking
Match the sequence to the steam system
A traditional wand lets you control the air intake through tip position. An assisted air-intake sleeve or automatic frother may introduce air differently; follow its insertion depth and cleaning instructions. Do not block an air inlet or remove a sleeve just to copy a manual-wand tutorial.
A single-boiler machine may need time to reach steam temperature, then a prescribed return to brewing mode. A thermoblock system can have its own startup delay. A dual-boiler or heat-exchanger machine may support simultaneous brewing and steaming, but that does not make every warmup or flush identical.
For one drink, prepare a clean station, brew the espresso and texture the milk promptly. For two, a larger pitcher can be practical if it stays within the machine's capacity; divide the integrated milk while swirling between pours so the second cup is not left with only foam.
Dairy and plant drinks need their own starting point
Milk composition and processing affect foam, and a brand change can matter as much as the plant name. Whole dairy milk is a useful familiar baseline for texture; lower-fat dairy and plant products can behave differently. Follow the product's shake, storage and steaming directions.
For a concrete brand example, Alpro recommends 60°C / 140°F for its Barista Almond and 65°C / 149°F for its Barista Soya, Oat and Coconut. Those are product recommendations, not universal temperatures for all almond, soy or oat drinks. Keep the brand, product and target in your log.
If a plant drink splits in the espresso, first verify freshness and the product's intended use, then compare a lower serving temperature or another barista formulation. Do not assume a separated drink needs more steaming or that a smooth one is nutritionally superior.
Evidence: Alpro: product-specific steaming targets
Diagnose the texture you can see
Change tip depth, angle or air time one at a time. A blocked wand or insufficient steam requires cleaning or machine-specific troubleshooting, not endlessly moving the pitcher.
| What you see or hear | Likely next test | Keep in mind |
|---|---|---|
| Large bubbles and splashing | Submerge the tip slightly more and introduce less air. | Do not pull an active tip out of the milk. |
| Hot milk with almost no foam | Start with the tip nearer the surface during the early phase. | Some products foam less; do not prolong heating indefinitely. |
| Too much stiff foam | Shorten the air-intake phase and submerge sooner. | Milk texture is easier to prevent than remove afterward. |
| No rolling motion | Move the submerged tip slightly off center and alter the pitcher angle. | Check suitable milk depth and clear steam holes. |
| Foam sits separately on top | Integrate with a rolling phase, then swirl and pour promptly. | Large bubbles and long waiting both make pouring harder. |
| Cooked or overheated flavor | Use a thermometer and stop earlier. | Do not re-steam leftovers to rescue the texture. |
| Piercing noise | Check that the tip is not too deep and that steam delivery is normal. | Sound alone does not diagnose one exact fault. |
| Weak or uneven steam | Stop and follow the wand-cleaning procedure. | Use approved tools only after the system is safe to service. |
A simple pour before decorative patterns
Swirl both espresso and milk. Tilt the cup a little and begin with a narrow stream from a modest height to combine the drink. As the cup fills, bring the spout closer if you want foam to remain on the surface. Straighten the cup as you finish.
For the first attempts, success is a drink with integrated texture and the intended coffee-to-milk balance. A white pattern is not evidence of better extraction. Do not overfill a cup just to finish a design; leave room to lift and carry it safely.
Froth without a steam wand
Use an electric frother within its hot-milk or foam fill mark, or heat milk gently in a suitable pan while monitoring temperature, then whisk or use a handheld frother in a deep vessel. Keep the whisk head immersed before starting and stop it before lifting to avoid splashes.
These methods can make a pleasant milk drink but may create a different bubble texture from manual steaming. Do not shake hot milk in a sealed jar. For small macchiato or cortado portions below a wand's workable minimum, a small suitable frother may waste less milk.
Ingredients and shared equipment matter
Check the exact ingredient and allergen label, including flavored powders and syrups. Milk, soy and nuts can matter to different guests; a plant drink is not automatically suitable for everyone. Ask about requirements before choosing ingredients. Separate clean pitchers, tools and appropriate handling help avoid cross-contact; a quick wipe is not a verified allergen-removal process.
Keep milk and opened plant drinks refrigerated according to their labels; use a refrigerator at 4°C / 40°F or below. Measure what you need, avoid topping fresh milk into warm leftovers, and do not return steamed milk to the carton. Use the separate storage guidance for time out of refrigeration.
Evidence: FDA: allergen labels and cross-contact · FDA: refrigerated food storage
Clean promptly and learn from the leftovers
Wipe and purge after every use, then wash the pitcher. If a tip blocks, follow the model's shutdown, cooling and removal instructions before using its cleaning tool; do not poke a live wand with an improvised sharp object.
Measure the milk left after your drink once. Reduce the next starting amount only while preserving the pitcher's workable minimum and expansion space. That turns an ambiguous fill-to-the-spout habit into a repeatable, lower-waste recipe.
Evidence: Breville: wand cleaning and unblocking
Sources & limitations
This guide combines source-based explanations and practical starting points. Coffee Jacob has not performed hands-on product testing or controlled tasting trials for this guide. Source check: 13 October 2026.